Monday, October 31, 2011

Happy Halloween! Trick or Treating with Apple Cider Doughnuts in our bellies!

Halloween is so much fun with all the treats :) I'm not so big on the tricking but I do have a two year old so...I've been wanting to make doughnuts for a while and thought Apple Cider Doughnuts sound delicious. I also fried them! Which doesn't happen often. We don't have a dedicated deep fryer so it's just oil in a pan with a thermometer. When we fry something in this house then we see what other delicious things we can fry also. We don't want to waste the oil :). So, it's like the Texas state fair up in this house when we have oil in a pan with a thermometer. I'm walking around frying up mozzarella sticks, pickled jalapenos, actual pickles, frozen ice cream might be fun, or a hunk of rice krispie treat. We can't have an actual deep fryer around here because then I would eat so much fried food my stomach would hurt and it would just not be good for anyone. But, every once in a while my husband and I feel like fried deliciousness. So, this time it was doughnuts. We haven't managed to fry anything else yet but deep fried portobellos are on my list. I didn't make the frosting in this recipe. I simply rolled them in a cinnamon-sugar mixture which was really good also :)

Apple Cider Doughnuts

Ingredients
2 1/4 teaspoons active dry yeast
3/4 cup milk, at room temperature
1/4 cup apple cider, at room temperature
1/4 cup warm apple cider (about 110 degrees)
3 1/4 cups flour
4 tablespoons butter, at room temperature
3 egg yolks
2 tablespoons sugar
1 teaspoons salt

apple cider frosting
3 cup confectioners' sugar
1/4 cup butter, at room temperature
1/4 cup apple cider

canola oil for frying

Directions:

for the frosting:
Beat all ingredients together until a spreadable icing forms.

For the doughnuts:
In a small bowl, sprinkle the yeast over the warm cider in the bowl of a stand mixer or large mixing bowl. Let stand until foamy, about 5 minutes.

Add the flour, remaining cider, milk, butter, egg yolks, sugar, and salt until you have a soft, elastic dough that comes together easily into a ball.

Place the dough in a greased bowl and cover with a tea towel or plastic wrap. Let the dough rise until it has doubled in bulk, about 1 1/2 hours.
Flour a clean work surface. Place the dough on the surface and roll it out. Roll until it is about 1/2 thick. Cut out doughnut shapes. Do not reroll to dough.
Place them on a parchment or silipat lined cookie sheet, cover again with the tea towel and let them rise 15-30 minutes. They should look puffy but don't need to have doubled.
Meanwhile, heat (to 350) about 3 inchs of oil in a heavy pot. Fry the doughnuts (2 or 3 at a time works well) flipping at least once to insure that they are golden brown on all sides, about 2 minutes.
Drain on paper towel lined plates or baking pans. Repeat for remaining doughnuts. Frost cooled doughnuts if desired. Eat the same day they are made.


Yield: about 12 doughnuts

Recipe from Coconut & Lime

Saturday, October 29, 2011

Gingerbread Ale Cookies

 Gingerbread Ale Cookies sound a little wild. I definitely got some off looks when  talked about the idea. My thought process was that if you can make a stout cake with a stout then why can't you make a cookie with a gingerbread ale. Why, indeed. I get really excited when I have an idea, a crazy idea, and I try it and it works. These cookies have a lovely hint of orange to them which I enjoy but if you don't you could always take it out. I saw this Gingerbread Ale from Bison Brewery and thought it would be fun to bake with, and drink of course. The ale on it's own I'm not a huge fan of but I would drink it. In the cookie it doesn't impart much of a flavor so you could also try this recipe with a stout probably or a different ale. I'm not really sure how a stout would change the texture though, I will have to experiment sometime. This is a really nice dough to work with, not to thick or thin, a little sticky, which can be helpful. I still added the typical gingerbread spices because I didn't think the beer could do it on it's own. I used Penzey's spices in these cookies as well as in the Gingerbread Toffee from a post a few days ago. If you're brave then you could leave out the spices and see what fun flavor you get. Oh! or you could leave out the spices then roll them in a cinnamon sugar mixture...that would be fun!

Gingerbread Ale Cookies
  • 2 bottles (12 ounces each) Gingerbread beer
  • 3 tablespoons molasses
  • 2 tablespoons honey
  • 1 1/2 sticks unsalted butter, at room temperature
  • 3/4 cups light brown sugar
  • 1 large egg
  • 1 medium orange, zested
  • 1 tablespoon orange juice
  • 2 cups all-purpose flour
  • ½ teaspoon baking soda
  • ½ teaspoon ginger
  • ¼ teaspoon cinnamon
  • 1/8 teaspoon cloves
  • ¼ - ½ cup granulated sugar (for rolling)
Directions
  1. Put the beer, molasses and honey into a medium saucepan and reduce over medium heat until you have about 1/3 cup of liquid. If any foam appears skim it off the top. Be careful of the mixture overflowing, it will  happen very quickly, if it does happen. You will know you have hit 1/3 of a cup of liquid as the liquid will suddenly begin to aggressively foam due to the high concentration of sugar (This looks different from foaming due to carbon dioxide, the bubbles are much larger with the sugar foaming). Let this reduction cool to room temperature.
  2. Preheat oven to 350 degrees F.
  3. Cream the butter and sugar together. Add the egg and blend thoroughly. Then add the orange zest, orange juice and beer reduction and blend again. Mix the flour, baking soda, and spices together then slowly add to the beer mixture.
  4. Fill a small bowl with the rolling sugar. Using a uniform scoop, scoop mounds of cookies into the bowl of sugar and roll until coated. (I used a #40 scoop which is about 1 ½ tablespoons). Place cookies onto an aluminum cookie sheet lined with parchment or a Silpat. Make sure you do not overcrowd the cookies; you should be able to fit about 12 cookies on a half sheet pan. Bake for 12-16 minutes. (Mine baked for 12 minutes).
  5.  Let the cookies cool on the cookie sheet until they are cool enough (about 10 minutes) to transfer to    wire racks to cool completely.

Recipe adapted from Food Network

Friday, October 28, 2011

Harvest Spice Cheesecake


So you remember the Pumpkin Spice Syrup we made a few weeks ago? Did you use it all in coffee drinks? With that delicious syrup I decided we could do other fun things with it, like cheesecake :) This isn't so much a pumpkin spice cheesecake because it only has a hint of the spice in it and a hint of the pumpkin flavor in it, so it's a harvest spice. The inside is super creamy and smooth as long as you mix the filling long enough to make sure to get all of the lumps of cream cheese out. I'm also a big fan of smaller portions and making less of the available portions so I'm not looking at a giant 10" cheesecake that keeps calling my name over and over...yum.

Harvest Spice Cheesecake

Ingredients:
1 1/2 sheets of cinnamon graham crackers, 6 small rectangles
2 packages cream cheese
1/2 cup sugar
1 tablespoon all-purpose flour
1/4 cup pumpkin spice syrup
2 eggs

Instructions:
1. Preheat oven to 375F. Spray 6 6-ounce ramekins lightly with cooking spray, or grease with butter.
2. Break the graham cracker sheets into 6 individual squares, break up each square into one of 6 ramekins.
 3. Beat cream cheese, sugar, and flour together in a stand mixer until combined well. Beat in the pumpkin spice syrup until mixture is smooth, then beat in eggs until mixture is smooth.
4. Pour mixture into ramekins dividing evenly. Place ramekins into a 9"x13" pan. Carefully fill pan with boiling or almost boiling water to half way up the side of the ramekins. Place pan in oven. Alternatively, you can put the pan in the oven with the ramekins in it, then add the hot water so there is less moving the pan.
5. Bake about 30 minutes or until the not set part in the middle of the cheesecake is no larger than the size of a dime. The cheesecakes will continue baking and setting after being removed from the oven. Remove from oven and move to a rack to cool. Once cool, chill in refrigerator for several hours.


Thursday, October 27, 2011

Taste Tests TILT

Things I love Thursday is one of my favorite days because I share my favorite things with you. One of my favorite things is reading Serious Eats Taste Tests. They are so fun to read and usually informative on products I've never tried. One you should check out because the season is right, of course, is the gingerbread taste test. Most of the products are usually easily attainable at a local grocery store but if nothing else you can order it online from somewhere. I wish I had a big piece of gingerbread to post a delicious picture but I haven't gotten there yet in my baking for this year. Soon, very soon...

Wednesday, October 26, 2011

Candied Pecans


Candied pecans are super easy, pretty quick, and can be made 100 ways. You can add cinnamon, brown sugar, cayenne, any crazy extract although I think Root Beer might be a bit odd, nutmeg, curry powder...
You can also use any nut or any combination of nuts. Pecans is what I had on hand so it's what I made. I have another recipe which I will post sometime for candied nuts which is a little different than this one and I tend to use it more often. My husband was pretty happy to come home from work to a bowl of these to munch on though. They can be sprinkled on fudge, the toffee from yesterdays post, salad for a nice treat, or stirred into cookies or brownies, anything really.

Candied Pecans

-1 cup pecans
-1/3 cup granulated sugar
-1 tablespoon butter
-1/2 teaspoon vanilla

1. Line a baking pan with non-stick foil or a Silpat. You can also butter regular foil.
2. In a heavy skillet combine nuts, sugar, butter, and vanilla. Cook over medium-high heat, shaking occasionally, until sugar begins to melt. You do not want to stir it yet.
3. Reduce the heat to low and cook the mixture until it is golden brown, now it's okay to stir occasionally. Remove from heat, pour onto the prepared baking pan. Cool completely.
4. Break into pieces. Store tightly covered for up to three weeks.

Recipe adapted from Better Homes and Gardens cookbook

Tuesday, October 25, 2011

Gingerbread Toffee covered with Dark Chocolate

I was thinking that Gingerbread toffee might be fun because I've never seen it before anywhere that I can remember. It's pretty quick and easy to make if you have a good heavy-duty pan and a candy thermometer. The bottom of this candy is buttery and crunchy which, in my opinion, any toffee worth eating should be. I used semi-sweet chocolate although I'm sure it would benefit even further from a nice high quality dark chocolate. The spices are pretty light but I like having a hint of the flavor and I didn't want it to overwhelm. I also contemplated using white chocolate instead and in a thin layer it may be really good, maybe I will try that sometime.

Gingerbread Toffee covered in Dark Chocolate

1/2 cup butter
1/2 cup sugar
1 1/2 tablespoons water
1/2 tablespoon light corn syrup
2 tablespoons molasses
1/4 teaspoon ginger
1/8 teaspoon cinnamon
dash cloves
1/2 cup chopped dark chocolate

1. Line a pan (about 5"x7") with foil, I used non-stick for good measure.
2. In a non-stick saucepan melt butter; add sugar, water, corn syrup, molasses, and spices.
3. Over medium-high heat cook and stir until mixture boils.
4. Reduce heat to medium, boil, stirring occasionally, until a candy thermometer measure 290F. Keep an eye on it when the temperature reaches 280 to be sue the mixture doesn't burn. Remove from heat.
Remove the thermometer from the pan. Pour the candy into the prepared pan, and tilt pan to make mixture even or spread.
5. After about two minutes, sprinkle with chopped chocolate, let stand a minute or two. Once soft, spread over the toffee. Chill for about 20 minutes until firm. Once firm, break into pieces. Serve.
6. Store in an air-tight container in the refrigerator.


Monday, October 24, 2011

Parmesan Pizza Dough


My husband and I started making our own pizza dough a few years ago. With my background and our love of pizza we thought it was easy enough so we tried it. We've made lots of recipes over the years but this is one that I really love. When it's make right it's almost like a Parmesan cheese cracker with pizza toppings, yum. It would also be lovely with some rosemary mixed in or as bread sticks. I've never tried it as bread sticks but I've talked about it :). I cut the dough into three and freeze two. Then I just thaw it in the refrigerator the night before and put it on the counter for an hour or two to come to room temperature. I roll it or press it by hand on a pizza peel sprinkled generously with cornmeal and top it. I've also posted some pictures of what the yeast should look like after about 5 minutes, nice and foamy. If it's not foamy after a few minutes don't bother using it because it's to old. The other picture is one-third of the dough ready to rise.


Pizza Dough

Ingredients:
  • 2 (1/4-ounce) envelopes active dry yeast
  • 2 cups warm water (100° to 110°)
  • 5 cups all-purpose unbleached flour, divided
  • 1 cup coarse-ground whole wheat flour
  • 2 teaspoons salt
  • 2 teaspoons sugar
  • 1 1/2 teaspoons dried thyme
  • 1/2 teaspoon granulated garlic
  • 1 1/2 teaspoons Italian seasoning 
  • 1/3 cup grated Parmesan cheese (optional)
  • 1/2 cup plus 3 tablespoons extra virgin olive oil, divided 
 Preparation:
  • Combine yeast and 2 cups warm water in a 2-cup liquid measuring cup, and let stand 5 minutes.
  • Combine yeast mixture, 3 cups all-purpose flour, whole wheat flour, next 5 ingredients and, if desired, cheese in a large mixing bowl; add 1/2 cup olive oil. Beat at low speed with an electric mixer until blended, stopping to scrape down sides as necessary. Stir in enough remaining all-purpose flour (about 1/3 cups) to make a stiff dough. (Dough will be smooth.)
  • Place dough and 1 tablespoon oil in a large lightly greased bowl, turning to coat top. Cover and let rise in a warm place, free from drafts, 45 minutes or until dough is doubled in bulk. Punch dough down.
  • Turn dough out onto a lightly floured surface, and knead 4 or 5 times. Divide dough into three equal portions, and shape into balls. Roll each ball into a 14-inch circle on a lightly floured surface. Place one 14-inch circle onto a lightly floured pizza peel; brush with 1 tablespoon oil, and prick with a fork. Add toppings to pizza dough.
  •  Place dough on a lightly floured pizza stone or baking sheet, and bake at 475° for 10 to 12 minutes.
  • Bake each pizza at 500° for 5 to 7 minutes or until browned and bubbly.
  • To freeze: Divide risen dough in three portions before kneading, and wrap in plastic wrap. Place in zip-top freezer bags; freeze up to 3 months. Thaw overnight in refrigerator.
Adapted from myrecipes.com

Friday, October 21, 2011

Rotini and Cheese Please...

Of course on the way to finding dessert you find dinner, just like when you're having dessert you may already be thinking about breakfast. It's sort of like when you're having a chocolate dessert and then start thinking of chocolate chip pancakes. My grandmother used to make us homemade mac and cheese but it this is an updated version of her recipe (without Velveeta and some other modifications). This recipe is easy to change to what you like or don't like or add in some extra vegetables or different cheeses. I'm pretty sure I use a different cheese each time I make it because I use what's in my refrigerator usually :). 

Rotini and Cheese

Makes about 3 side servings or two main servings

1 cup uncooked rotini, penne, or other pasta, whole wheat if you prefer
1 cup 1% milk
1 1/2 tablespoons all-purpose flour
dash salt
as much pepper as you like
dash of cayenne (a put in a little more because I like it spicier)
1-1 1/2 cups shredded cheese, any flavors, I like colby jack, cheddar, Italian blend...
1/2 can diced tomatoes, undrained, any variety you like, I usually just use unsalted petite diced
1. In a saucepan cook and drain the pasta following package directions. Put back in saucepan and cover to keep warm.
2. In another saucepan stir together milk, flour, salt, pepper, and cayenne until smooth, using a wire whisk. Cook over medium heat, stirring constantly, until mixture boils and thickens. Remove from heat, stir in cheese until melted, then stir in tomatoes.
3. Add pasta to cheese mixture. If desired, sprinkle with bread crumbs, spray with a little pan spray and bake at 350F until edges are bubbly and bread crumbs are brown.


Thursday, October 20, 2011

Things I Love Thursday


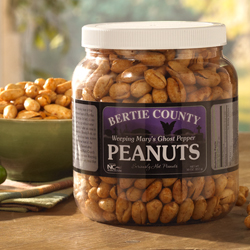
TILT is bringing you Weeping Mary's Ghost Pepper Peanuts this week. These are from Bertie County Peanuts in Windsor, NC. I have tried the Salt and Pepper peanuts which were amazingly delicious. I'm anxious to try the Ghost Pepper peanuts because I love hot. I'm thinking about getting some as a gift for a friend who loves foods that everyone else deems to hot to eat. They have tons of flavors to choose from and I think a variety pack is in order. NC hosts several festivals and events that are all about NC made foods and they're a great place to try foods that are local or almost local. I don't remember as many festivals when I lived in Virginia but it doesn't mean they weren't there :). You should look around locally and see what great festivals you have!

Wednesday, October 19, 2011

Peach Turnovers


Pie is something my husband loves, it has always been a joke in our family because if you ask him what he wants for dessert he always says pie. We had some friends coming over for a cookout and I decided to make Peach turnovers for the occasion. There's a tiny corner missing because my son decided it looked delicious. He was right. The dough was different than any dough I had worked with. I expected it to be more like pie dough but it was smoother. It was easy to roll and cut though. I had a lot of peach filling left over so I put it into a mini peach pie for my husband and he was okay with that :). Then he had a whole tiny pie to himself that nobody else knew about. The recipe is for Hand Pies which I did some of then I just did turnovers and sealed them as much as I could on the edges, they leaked a little juice but nothing crazy and still looked really good.


Peach Hand Pies from Smitten Kitchen

Makes 14 to 24 (depending on cutter size)
For the pastry:
2 1/2 cups all-purpose flour
1/2 tsp. salt
16 tablespoons (2 sticks, 8 ounces) unsalted butter, cut into
pieces
1/2 cup sour cream
4 teaspoons fresh lemon juice
1/2 cup ice water
For the filling:
2 pounds of peaches
1/4 cup flour
1/4 cup sugar
Pinch of salt
1 teaspoon bourbon
1/2 teaspoon vanilla extract
One egg yolk beaten with 2 tablespoons water (for egg wash)
Coarse sanding sugar, for decoration
1. To make the pastry, in a bowl, combine the flour and salt. Place the butter in another bowl. Place both bowls in the freezer for 1 hour. Remove the bowls from the freezer and make a well in the center of the flour. Add the butter to the well and, using a pastry blender, cut it in until the mixture resembles coarse meal. Make another well in the center. In a small bowl, whisk together the sour cream, lemon juice and water and add half of this mixture to the well. With your fingertips, mix in the liquid until large lumps form. Remove the large lumps and repeat with the remaining liquid and flour-butter mixture. Pat the lumps into a ball; do not overwork the dough. Cover with plastic wrap and refrigerate for 1 hour. If preparing ahead of time, the dough can be stored at this point for up to one month in the freezer.
2. Divide the refrigerated dough in half. On a lightly floured work surface, roll out one half of the dough to 1/8-inch thickness. Using a 4 1/2-inch-round biscuit cutter, cut seven circles out of the rolled dough. Transfer the circles to a parchment-lined baking sheet, and place in the refrigerator to chill for about 30 minutes. Repeat the rolling, cutting, and chilling process with the remaining half of dough. (I used a 4-inch cutter–if you can call a “cutter” the tin edge of the container that holds my smaller round cutters–and managed to get 12 from each dough half, after rerolling the scraps.)
3. Make the filling: Peel and chop the peaches into small bits (approx. 1/2-inch dice), much smaller than you’d use for a regular-sized pie. Mix them with the flour, sugar and pinch of salt, and add the bourbon and vanilla, if you wish.
4. Remove the chilled dough from the refrigerator, and let stand at room temperature until just pliable, 2 to 3 minutes. Spoon about 1 to 2 tablespoons filling (use the smaller amount for a 4-inch circle) onto one half of each circle of dough. Quickly brush a little cold water around the circumference of the dough, and fold it in half so the other side comes down over the filling, creating a semicircle. Seal the hand pie, and make a decorative edge by pressing the edges of the dough together with the back of a fork. Repeat process with remaining dough. Place the hand pies back on the parchment-lined baking sheet, and return to the refrigerator to chill for another 30 minutes.
5. Heat oven to 375 degrees. Remove the chilled hand pies from the refrigerator, cut a small slit in each and lightly brush with the egg yolk wash. Sprinkle sanding sugar generously over the pies, and place pies in the oven to bake. Bake until the hand pies are golden brown and just slightly cracked, about 20 minutes. Remove the pies from the oven, and let stand to cool slightly before serving.


Tuesday, October 18, 2011

Carrot Cake Blondies


My husband loves carrot cake and so one day I thought it would be fun to make these. It took me a while to get the recipe to where I want it, but I'm really happy with it now and everyone who tries them seems really happy also :). I enjoy making individual portions of food and I used an individual "brownie" pan the first time I made this to share with you all. I've also made them in that 1 1/2" silicone mini squares pan.


Monday, October 17, 2011

Bread for Buns

We had some friends over for a cookout and I'm the over-industrious type of person. Fortunately for me these aren't difficult or time consuming. I was also making peach turnovers but those will be posted another day. These were really good with portobello burgers and beef burgers and we were even eating a few plain before our friends got here. There aren't any sesame seeds or anything on them because my husband requested they be plain when I asked. They do have an egg wash though. It's always optional to sprinkle on some toasted sesame seeds or poppy seeds. So, if you're having a cookout or some burgers you should give these a go because they're fun. I made smaller buns and got 24 out of them which  fit slider size burgers just to give you an idea of the yield. I can't take all the credit for these delicious buns, so they were adapted from the recipe here. Tomorrow I will post an original recipe that has carrots involved :)

Ingredients

  • 1 cup milk
  • 1/2 cup water
  • 1/4 cup butter
  • 4 1/2 cups all-purpose flour
  • 1 (.25 ounce) package instant yeast (or about 2 1/2 teaspoons)
  • 2 tablespoons white sugar
  • 1 1/2 teaspoons salt
  • 1 egg

Directions

  1. In a small saucepan, heat milk, water and butter until very warm, 120 degrees F (50 degrees C).
  2. In a large bowl, mix together 1 3/4 cup flour, yeast, sugar and salt. Mix milk mixture into flour mixture, and then mix in egg. Stir in the remaining flour, 1/2 cup at a time, beating well after each addition. When the dough has pulled together, turn it out onto a lightly floured surface, and knead until smooth and elastic, about 8 minutes.
  3. Divide dough into 12 equal pieces. Shape into smooth balls, and place on a greased baking sheet. Flatten slightly. Cover, and let rise for 30 to 35 minutes.
  4. Bake at 400 degrees F (200 degrees C) for 10 to 12 minutes, or until golden brown.
  5. For Hot Dog Buns: Shape each piece into a 6x4 inch rectangle. Starting with the longer side, roll up tightly, and pinch edges and ends to seal. Let rise about 20 to 25 minutes. Bake as above. These buns are pretty big. I usually make 16 instead of 12.


Friday, October 14, 2011

Pumpkin Spiced Syrup


 I was meandering around the internet world looking for nothing in particular when I came across this recipe for Pumpkin Spiced Syrup. I saw it over on Annie's Eats which is a website I love to meander around you see. She always has gorgeous pictures and delicious food. I decided to make it to put in coffee and something else but I haven't decided yet what else to do with it. I am storing mine in a canning jar because I have them and they are easy to store in and adorable for gift giving it you do it in an aesthetically pleasing way. Am I giving mine as a gift? No...but my husband can have some if he wants some :).

Pumpkin Spice Syrup

Ingredients:
1½ cups water
1½ cups sugar
4 cinnamon sticks
1 tsp. ground nutmeg
½ tsp. ground ginger
½ tsp. ground cloves
3 tbsp. pumpkin puree

Directions:
Combine the water and sugar in a medium saucepan and heat over medium-high heat, stirring occasionally, until the sugar has completely dissolved.  Toss in the cinnamon sticks and whisk in the remaining spices and the pumpkin puree.  Continue to cook for about 5 minutes, stirring frequently, without letting the mixture come to a boil.  Remove from the heat and allow to cool for 10-15 minutes.  Strain the syrup through a fine mesh strainer or cheesecloth and store in your container of choice.   Store in the refrigerator.

Annie's Directions on making a homemade Pumpkin Spice Lattee. This...makes me want a frother because I think it would definitely take it to the next level. Yum!
To make a pumpkin spice latte, combine 2 ounces of hot coffee or 1 shot of hot espresso (about 1-1½ ounces) with 5-6 ounces of steamed low-fat milk.  Stir in 1½-2 tablespoons of the pumpkin spice syrup.  Taste and adjust amounts accordingly.  Top as desired with freshly whipped cream, ground cinnamon and drizzle with caramel sauce.

Thursday, October 13, 2011

Things I love Thursday

For this TILT I am excited to talk about Trader Joe's Dark Chocolate with Caramel and Black Sea Salt bar. I've always heard good things about Trader Joe's chocolate but I had not tried them before. I'm sure you know I love caramel and sea salt so when I saw this it was definitely an impulse buy. I'm glad I did but I'm not sure I would again. The flavor was awesome: crisp, chocolatey, gooey caramel, and a touch of salt. My gripe with this bar is that it has scores on it for you to break it apart but I couldn't get it to break on the scores and the caramel is so runny that it drips out of the jagged edge of chocolate onto hands or whatever else. I would consider purchasing it because it tasted so good but I would think twice because I am a fan of breaking chocolate into neat squares.

Tuesday, October 11, 2011

Burnt Sugar Cupcakes

I realized I love Burnt Sugar Cake but it's probably because I love caramel. I'm pretty sure I've talked about that slight obsession previously. Anyway, I created this recipe when I had a hankering for some sweet cupcakes that were a little different than the average vanilla. If I ever did open a bakery then I wanted to use this for my "vanilla" cake recipe. This is a small recipe that only makes 6 cupcakes because I couldn't keep making dozens of cupcakes at a time. Although I would have made lots and lots of friends it would not have been good for the waistline you see. Lots of baking, only two of us, only so many co-workers, yes yes you see. Six cupcakes is also a lovely treat. I use the Madagascar Vanilla Bean Paste that you can find at specialty stores because I love the flavor it brings to a dessert and the look of the beans. It is a little more expensive but you don't need much.
Burnt Sugar Cake

-1/2 cup sugar
-1/4 cup butter
-1 whole egg
-1 teaspoon vanilla bean paste
-3/4 cup flour
-1 teaspoon baking powder
-1/4 cup milk

1. Preheat oven to 350F.
2. Cream together butter and sugar. Add in egg and mix.
3. Add in vanilla bean paste, then flour and baking powder, mix.
4. Add in milk, stir.
5. Divide between 6 cupcake cups. Bake about 21 minutes.

Vanilla Frosting

-1 1/2 cups confectioners sugar
-1/4 cup cornstarch
-1/2 cup vegetable shortening or butter
-4 tablespoons water
-1/2 teaspoon vanilla bean paste
-sanding sugar (optional)

1. Mix all ingredients together except sanding sugar, if using, and beat on high speed of mixer for 5 minutes until fluffy. If desired, mix in some sanding sugar to taste to add crunch.

Sugar Shards

Spread granulated sugar in small circles on a silpat or parchment paper in even layers. Bake at 400F until melted and golden, about 5-6 minutes. Watch very closely because it will burn if it's in the oven 10 seconds to long. When you think it's almost done you can pull it out and let it finish setting up out of the oven because the sugar will continue to bake. Cool completely, break into pieces for decoration.


Monday, October 10, 2011

Pumpkin Custard for the season

Since it's autumn officially I decided to make some Pumpkin Custard. I have some older magazines (don't we all) and so I looked through them and came across this delicious looking recipe. The original recipe can be found in the Taste of Home's Halloween Food & Fun magazine, it looks like from 2003 because they don't put the date on the front cover. This was super easy to throw together and in my opinion for some reason tastes better than a pumpkin pie. Do you know many bakers who don't like pie crust? I'm not really a fan so I like to make "crustless pies" which is unfortunate for my husband who loves pie, any pie.

Pumpkin Custards

Ingredients
-1 can pumpkin (16 oz)
-1 can evaporated milk (12 oz)
-1/3 cup  sugar
-2 tablespoons honey
-1 teaspoon ground cinnamon
-1/4 teaspoon cloves
-1/4 teaspoon nutmeg
-2 whole eggs

In a mixing bowl, combine all ingredients; beat on low until smooth. Place eight ungreased 4-oz. custard cups into 2 eight inch square baking pans. Fill each cup with 1/2 cup of pumpkin mixture. Pour hot water around the cups into the pans to a depth of 1". Bake at 325F for 40-50 minutes or until a knife inserted near the center comes out clean. Remove from pans to cool on wire racks. Before serving, top each with dollops of whipped topping. Makes 8 servings.
Related Posts Plugin for WordPress, Blogger...